Types of atomizers and coil builds
It’s no surprise that in the third trimester of 2014, open tank systems have surpassed cig-a-like and disposable models in sales across the US, because the trend was very obvious from the last quarter of 2013. Tank systems are essential accessories for any advanced personal vaporizer or mechanical mod that make use of the battery in order to heat up a vaporizing element and transform the e-liquid into delicious clouds.
Tank systems have evolved from clearomizers and cartomizers and nowadays they are a sub-industry of the e-cigarette market with many brands already making a name for themselves and coming up with new and improved models each few months. They are grouped into several categories, depending on functionality and the type and some of these categories are: RDAs (rebuildable dripping atomizers or drippers), Genesis style atomizers, Kayfun style atomizers, Aspire and Kanger tank systems and clearomizers.
RDAs or Drippers are types of atomizers that do not have additional tanks to store e-liquid, and they work by the user continuously feeding the wicking with drops of e-juice. They require constant attention but at the same time, they give out the biggest clouds of vapor. They are usually made of a top cap, bottom cap and the deck with a positive central post and a single or multiple negative posts. They allow for single, dual or quad coil builds and they benefit from fixed or adjustable air holes.
Genesis style atomizers consist of a deck located at the top and a bottom tank that can be filled with e-liquid. The idea is that they use a steel mesh (or any other type of material) for wicking and the e-liquid is carried from the bottom tank to the coil or coils at the top. They usually allow for single or dual coil configurations and present holes in the deck for the mesh to reach the tank.
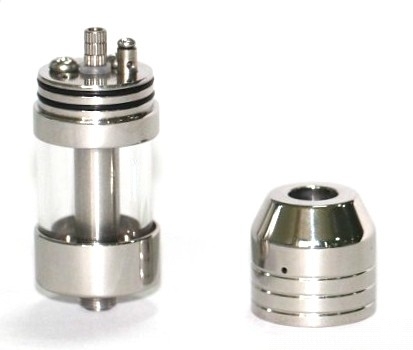
Kayfun style atomizers are a bit more complex, having a rebuildable deck at the bottom and a tank surrounding it. The deck is placed inside a chimney and it usually allows for single coil builds. The wicking material is constantly soaked in e-liquid from the tank making it a hybrid between an RDA and a Genesis style atty. They are usually crafted of stainless steel with the glass walls made from Pyrex.
Tank systems from Aspire and Kanger are devices that use pre-build, replaceable, encased coils surrounded by a tank full of e-liquid. They are very versatile and by far one of the easiest to use. The coils come in different resistances and they need to be replaced every 20 days. The tanks usually have an adjustable airflow design giving the user more control on the whole vaping experience.
Clearomizers are simplified versions of tank systems and also work with replaceable atomizer heads that can be single or dual coil. They are very simple to use and refill and this is why they are still used by many vapers out there.
Rebuildable dripping atomizers or RDAs are very popular among vapers that like building their own coils and are best suited for cloud chasing. Today we are going to look on the tools required and the procedure of coil building on this type of device. So let’s say we have a dripper with a central positive posts and two outer negative posts and we want to build a dual coil configuration.
First of all, regular RDAs are made of two parts – a top cap and a bottom part that includes an outer rim (called the well) and the deck. Some designs include an adjustable airflow ring around the well, others include a removable deck, but the idea is the same. Once you take the RDA apart, you will need to connect micro coils between the positive post and the negative posts. These posts are usually fitted with thumb screws or Philips screws or a combination of both. They also have holes through which you have to pass the Kanthal wire. Some models don’t have holes and you need to twist the wire around the screw heads, other have spring loaded posts that don’t have screws.
The first thing you need in order to start the whole process is some Kanthal wire. Depending on the gauge and number of wraps you can achieve a desired resistance. To create the coils you will need to wrap the wire around a drill bit or a Philips head screwdriver. The coils need to be identical in number of wraps and the type of Kanthal used in order to work as intended. When we are talking about dual coils, you need to understand that the total resistance of the atomizer will be half of each individual coil. So if we are aiming of a 0.8Ohm build, we need that both the coils we have wrapped to have a resistance of 1.6Ohms.
Once you’ve made the coils you will need to pass them through the holes in the posts. Usually it’s simpler if you leave one end of the coil longer and one shorter. A screwdriver is handy to help you guide the coils through the holes. Once they entered, you simply push the coil into position. You will have to do the same with the coil on the opposite side, and usually considering the central positive post as a “mirrorâ€. This is great for atomizers that have airflow holes on the two opposite sides. If your atty has vent holes on four sides, you can mount both coils on the same side, or one in front of the other, without any symmetry. After the coils are mounted, you will need to screw the posts and fix them into position. After that, you simply have to cut the leftover ends off or twist them up and down continuously until they break.
Once everything is in position, the next imperative step is to measure the total resistance of your build. This is crucial especially if you are using a mechanical mod because the wires can have a lower or higher resistance than the one you calculated or they can short circuit. To do this you can use a regular multi meter, but there are also dedicated 510 threaded ohmmeters designed solely for this purpose. If you are using a high-end advanced personal vaporizer, then it is very likely it has a built-in ohm meter so all you need to do is mount it and make sure you don’t press the firing button before you get a clear reading.
If you are satisfied with the resistance, you can mount your atomizer on the mod and fire it. What you are looking for is a uniform glow on both coils without any “hot spots†or “cold spots†in between. You will have to use a pair of tweezers to press on the coil once it hot in order to help it mold into shape. The coils also need to be oxidized properly before first use to get rid of any metallic taste.
Once you’re done with the Kanthal, you’re ready to start wicking. The material most often used in this case is organic cotton. You simply fold and roll a piece of cotton and pass it through each coil. You then use a nail clipper to cut off the ends, but make sure you leave enough wicking to fill the well. There is no right or wrong way of doing this, you can even go in circles between the two coils, as long as there is enough cotton to absorb the e-liquid and feed it to the Kanthal.
Now everything you need to do is to take out your favorite e-liquid flavor and spill a few drops on the cotton while allowing it to soak. Then infuse the wicking with a few more drops, being careful not to go over the well. Then simply connect the atomizer to the mod and press the firing button, You should see some clouds forming and this is the indicator that everything works ok.
You can now attach the top cap and the drip tip and you are ready to puff. You will need to pay attention to constantly pour e-liquid on the cotton and take into consideration the fact that the heat affects the Kanthal and the coils don’t last forever. In addition, you will need to clean your coils regularly with hot water and re-wick it one it starts to taste different than it did at the beginning.
Kayfun style tanks are very popular among vapers out there and they are a hybrid between a rebuildable dripping atomizer and a tank to hold the e-liquid, thus eliminating the need to constantly drip. These devices usually consist of a top cap that holds the drip tip, a Pyrex glass wall to hold the e-liquid, the top part of the chimney, the bottom part of the chimney (generally unscrewable) and the deck with the positive and negative posts. The basic idea behind this type of atomizer is that you build a coil and mount it between the positive and negative coils, with the wicking material always in contact with the e-liquid inside the tank, ensuring a steady flow of juice. It’s kind of the best of both worlds.
In order to start building the coils you will need some AWG 28 (0.32mm) Kanthal (or any type of Kanthal wire as long as you are familiar with the resistances depending on the number of wraps) and a screwdriver (we used a 2.5mm diameter – you can use a drill bit as well). You will have to consider the position of the positive and negative posts on the deck, and with that image in mind, start wrapping the Kanthal round the screwdriver at least six times for a resistance above the 1 Ohm limit. Once you are done wrapping, you will need to trim the excess off, but leave at least 5cm of wire on both sides of the coil. You will need to press it thoroughly in order for the coil to be stiff enough and then you are ready to mount it.
Simply take your screwdriver and position it between the two posts, then take one end of the wire and go around the unscrewed positive post before tightening it back in place. You then do the same with the negative post, being careful to use the appropriate end and not to overpass the two. Also the coil needs to be on top of the deck, but without touching it so after you fix the screws, use the screwdriver to pull it up. Now use a torch (butane works best) to heat up the coil and press it with some tweezers.
Before you go any further, you will need to check the resistance of the atomizer by using an ohmmeter and once you are satisfied with the result you can go to the wicking part. For wicking we it’s ideal to use organic cotton and you need to roll out a thread and pass it through the coil. You then have to cut both end with a scissors paying attention not to cover the air channels, but at the same time to leave enough cotton inside the chimney.
Then you will need to soak the wicking and arrange it into position with your screwdriver, before mounting the bottom part of the chimney. Once you put your atty on a mod and it starts creating vapor as you press the firing button, you can connect the whole tank and fill it with e-liquid. You are now ready to vape on your first Kayfun coil build.
The Genesis style atomizers are rather unique in functionality, even though in appearance they might seem a bit similar with the Kayfun or tank systems. They usually consist of three main parts: a top cap, a deck and a Pyrex tank to hold the e-liquid.
Coil builds on a Genesis atomizer is not the same as you would do it on a normal RDA or a Kayfun style device. Instead of a cotton wick to feed the e-juice to the coil, this type of atomizer requires the use of a stainless steel mesh. It is recommended that you use a low-density mesh if you are vaping on thicker e-liquids and a high-density mesh in the case of thinner e-juices.
Once you take the top cap off, you will notice the deck and the posts. Depending on the model, a Genesis style atomizer can allow for a single or dual coil build and there is usually a center positive post and one or two negative posts. You will also notice some holes drilled in the base – one or two (usually in the case of two holes, the second one is covered with a screw) for the steel mesh and one for refilling with e-juice.
To start building your atty, you will need a piece of stainless steel mesh measuring about 1.5†x 1.0â€(3.8cm x 2.5cm) that you need to roll on its length very tightly until it can fit through the hole in the base without being too flush. Then you will need to oxidize the mesh carefully by using a blowtorch, a cigarette lighter or any gas powered flame. You will then insert the rolled mesh inside the tank and start working on the coil.
For the coil you will need some AWG 28 or AWG 32 Kanthal wire, that you will need to fix onto the positive post, then wrap it around the mesh 4 or 5 times depending on the resistance you want to achieve. Instead of really close wraps like in the case of an RDA, with the Genesis you will need to leave some space between the wires and keep the distance constant with each passing. Once you are done you will have to constantly fire your mod and pull on the coil and mesh to get rid of any hot spots that might appear. Once you’re done, it’s a good idea to pour some e-liquid on the mesh and coil for a couple of times and fire your mods until it vaporizes.
You are now ready to fill up the tank with your favorite e-liquid, put on the top cap and start vaping. The Genesis coil last for a long time when comparing it to a regular RDA and it delivers constant and solid vapor. In a dual coil configuration it delivers even more e-puffing delight and once you get the hang of it, it will probably become your day-to day vape.
RELATED REVIEWS:

7 Great alternatives to the JUUL vape
Despite being considered the best selling e-cigarette product of all time, this device it’s still surrounded by a lot of controversy. Because of this we decided to present a few great alternatives to the JUUL vape and tell you why you should give the .... »
Everything you need to know about disposable pod vapes
Disposable pod vapes have quickly become incredibly popular products. Despite being launched just a year ago, they are now they ar .... »
V2 Alternative vapes
V2 permanently closed down in November 2019 and since then we've been getting numerous questions from our readers. People want to know if there are any good V2 alternative vapes out there or if their favorite ecigs are compatible with accessories from .... »
5 Popular low output vaporizers we like
Low output vaporizers are tiny, ultra-portable all in one devices which work very well with nicotine salts e-liquids. They usually have an output of between 11 – 18W and battery capacity ranges from 350 – 650mAh. These vaporizers have become increa .... »

How to pick the right pod mod
Pod style vaporizers or pod mods are extremely popular nowadays. They offer quick and easy nicotine fix and they are so easy to carry around. But with so many models on the market it's often hard to set your mind on a particular device. This is why we .... »

Everything you need to know about e-liquids
Once you become a vaper there are two important things you need to constantly stock up on – e-liquids and atomizer heads. And while atomizer heads are usually the same and last between 1 – 2 weeks each, e-juices are a totally different story. .... »
Best e-cigarettes

Best vape pens
Best box mods & vape mods
Best disposable e-cigs

Best closed system vapes